How To...
This page will give you guided, step-by-step instructions, with photos, on how to use the ISPT™. Also included is a brief video demonstration. If you choose to view the video, please be patient as it may take a little time to load.
Please choose your video quality below:
STEP-BY-STEP INSTRUCTIONS:
DISASSEMBLY:
How to use the ISPT™ during disassembly of your pistol (photos on this page are of a 1911-style pistol, but the procedure is similar for other pistols as well):
|
 1. Follow all rules for safe handling of firearms, as well as the warnings contained in your owner's manual. Always treat the gun as if it is loaded. 1. Follow all rules for safe handling of firearms, as well as the warnings contained in your owner's manual. Always treat the gun as if it is loaded.

 2. Remove the magazine from the pistol. Make sure there is no ammunition anywhere near you. If possible, conduct all firearm maintenance in a designated workroom where you never bring any ammunition. 2. Remove the magazine from the pistol. Make sure there is no ammunition anywhere near you. If possible, conduct all firearm maintenance in a designated workroom where you never bring any ammunition.

 3. Clear the chamber, which assures that the pistol is fully unloaded. 3. Clear the chamber, which assures that the pistol is fully unloaded.

 4. Retract the slide to the point where, in your pistol's instruction manual, the slide stop can be removed. On a 1911-style pistol, this is when the lug on the slide stop is opposite the clearance notch on the slide. 4. Retract the slide to the point where, in your pistol's instruction manual, the slide stop can be removed. On a 1911-style pistol, this is when the lug on the slide stop is opposite the clearance notch on the slide.
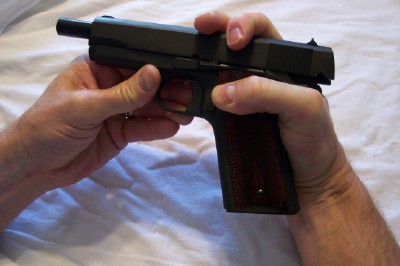
 5. Push out the slide stop pin very slightly, not enough to completely expose the lug of the slide stop, but just enough to permit placement of the product onto the left side of the pistol. Ensure that the top side of the product goes between the slide stop and the frame, and the magazine release button comes through the hole in the ISPT™. 5. Push out the slide stop pin very slightly, not enough to completely expose the lug of the slide stop, but just enough to permit placement of the product onto the left side of the pistol. Ensure that the top side of the product goes between the slide stop and the frame, and the magazine release button comes through the hole in the ISPT™.

 6. Completely remove the slide stop. Note how the ISPT™ ensures that the lug of the slide stop cannot accidentally scratch the frame. 6. Completely remove the slide stop. Note how the ISPT™ ensures that the lug of the slide stop cannot accidentally scratch the frame.

 7. Continue with normal disassembly procedures, as specified in the pistol's user manual. Always be cautious with the recoil spring, because it may be under tension. 7. Continue with normal disassembly procedures, as specified in the pistol's user manual. Always be cautious with the recoil spring, because it may be under tension. 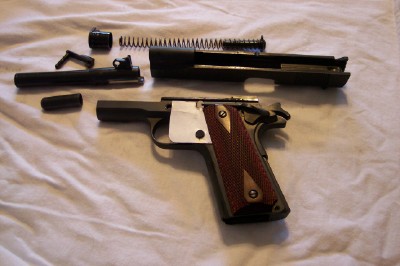
|
*****The ISPT™ can be left in place during cleaning or other activities, so it will still be there when the user is ready to reassemble the pistol.*****
REASSEMBLY:
How to use the ISPT™ during reassembly of your pistol (photos on this page are of a 1911-style pistol, but the procedure is similar for other pistols as well):
|
 1. If the ISPT™ was not left in place after disassembling the pistol, place the device onto the left side of the pistol, ensuring that the magazine release button comes through the hole. Once you have followed the normal procedures for reassembling the slide (per your pistol's user manual), begin the final reassembly. 1. If the ISPT™ was not left in place after disassembling the pistol, place the device onto the left side of the pistol, ensuring that the magazine release button comes through the hole. Once you have followed the normal procedures for reassembling the slide (per your pistol's user manual), begin the final reassembly.

 2. Insert the slide stop pin (make sure it goes through the barrel link, if applicable). 2. Insert the slide stop pin (make sure it goes through the barrel link, if applicable).
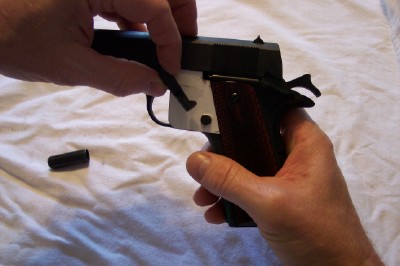
 3. OK now -- here is where the ISPT™ really earns its keep! Normally, this is where the idiot scratch occurs. During this fairly complex operation, the slide stop must be pushed inward far enough to depress the plunger, and it must be simultaneously rotated upward, toward the clearance notch. 3. OK now -- here is where the ISPT™ really earns its keep! Normally, this is where the idiot scratch occurs. During this fairly complex operation, the slide stop must be pushed inward far enough to depress the plunger, and it must be simultaneously rotated upward, toward the clearance notch.
With some pistol designs, you are also attempting to perform this function while resisting recoil spring tension! With the ISPT™ in place, there are no worries, though. The photo below shows exactly how the Idiot Scratch Prevention Tool™ protects the frame as the slide stop is manipulated into place.

 4. Insert the slide stop lug through the clearance notch in the slide. 4. Insert the slide stop lug through the clearance notch in the slide.

 5. Finish re-assembly as specified in the pistol's user manual. 5. Finish re-assembly as specified in the pistol's user manual.
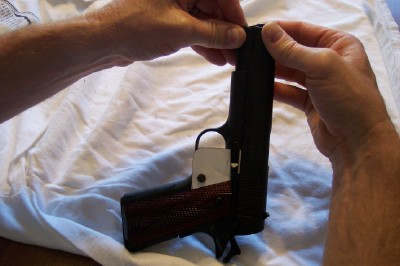
 6. Remove the ISPT™ (depending on which ISPT™ model you have, it may be necessary to push the slide stop ever so slightly outward to fully release the tool). 6. Remove the ISPT™ (depending on which ISPT™ model you have, it may be necessary to push the slide stop ever so slightly outward to fully release the tool).

 7. You have now successfully disassembled and reassembled your pistol - and you have done it without scratching the frame! 7. You have now successfully disassembled and reassembled your pistol - and you have done it without scratching the frame!

|
We hope that the ISPT™ has saved you from the pain, suffering,
frustration, cost, (and might we even say the embarrassment?)
of that wonderful little thing we all know affectionately as an "idiot scratch"!
|
